MosaicBlues: Mirror .entry-content { font-size:25px !important; }
Showing posts with label Mirror. Show all posts

Monday, April 14, 2014

Fall Foliage


I made Fall Foliage for a friend of mine who asked me last Fall if I could do something to hide the wall behind her kitchen stove.

Becky's house is nice and spacious, it shelters beautiful ancient furniture and is built around a luminous octagonal living room decorated with beautiful art. Becky also has a passion for gardening. She loves to spend time out in her yard enjoying her plants and trees.

First we had to find the best design fitting her kitchen and tastes. Becky expressed her wish to have something inside the house reminding her of her garden outside. I proposed her different designs : 

Green Jungle


Golden leaf


Red Maple

To help her better visualize the final result I created images of what the mosaic would look in her kitchen.

Finally, I came up with an example of a richly coloured pattern of fall foliages, and we decided for that one. 


This was mid November 2013, and I could get in gear.

Because the wall receiving the mosaic is made of sheetrock and part of the piece would be behind the stove, we needed a very thin piece. This way the stove would stay flush with the kitchen countertop. 

I decided that I would use glass only, and build the mosaic directly on top of a fiberglass mesh. This mesh would then be directly glued on the wall once the piece complete. 

First came the black and white drawing of the piece at the actual dimensions on heavy white paper.


Black and White Sketch - December 5, 2013

I added some colours to make all contours more visible.

Contoured sketch, December 5, 2013.
Once this model laminated, I could actually start to actually build the mosaic. 

Right before Christmas, I laid a layer of Fiberglass mesh on top of the model and started to glue some red glass tiles onto it.

December 22, 2013

And I flew back to France to deliver an other commissioned mosaic...

Ubi to Gaius Mosaic (2013)


... and spend the holidays with family and friends.


Back in Alabama I resumed the work in January, adding several colours to the work, Beginning with the leaves.

Fall Foliage, January 12, 2013
 I used various shades stained glasses and mirrors.

Fall Foliage, January 13, 2013.

Some of these materials came from the USA, others from France and Italy.

On February 9, all leaves had been laid. 

Fall Foliage, February 9, 2014.

And I started to work on the branches and contours of the leaves.

Fall Foliage, February 15, 2014.

Finally, by the end of February, all glass tiles had been glued to the mesh and I was able to separate the mesh from the model.

Fall Foliage would finally get out of the workshop to see the sun !


Fall Foliage, March 2, 2014


You can judge by yourself how the nature of the light totally change the way a mosaic looks !


Fall Foliage, March 2, 2014.

It was now time to install the piece on site.


I first glued the piece to the wall and completed the tile work on both sides of the stove.


Fall Foliage, March 15, 2014.


We let the glue set for 2 weeks before the first application of a black unsanded grout.
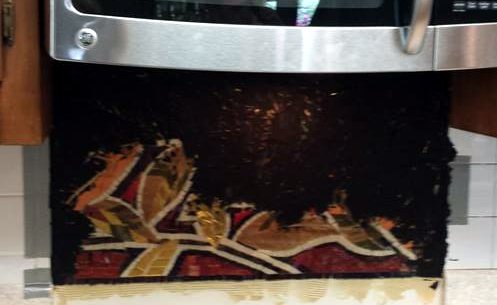

Grouting - a dirty business...


Fall Foliage, March 30, 2014

When I use different colours grout on a same piece, I like to begin with the darker one. I apply each colour on a different day and waterproof each colour grout before I apply the next one. 

I grouted the white tiles on April 3rd, and completed the waterproofing on April 5. 

 
Fall Foliage, April 5, 2014.


Fall Foliage Mosaic - detail 1.


Fall Foliage Mosaic - detail 2.


Fall Foliage Mosaic - detail 3.

MISSION ACCOMPLISHED !


If you would like to discuss the commission of a mosaic please call (334) 798 1639 or email me at frederic.lecut@gmail.com. I also have finished pieces available at mosaicblues.com.

Monday, July 1, 2013

The Kids II - Completed

I just realized I had not posted the completed piece  - Aaron and Nathalie's kids...

So here we are ! Cover your eyes !


This piece is 24 x 24 " totally made of glass and mirror tesserae.

It takes me about 3 month to realize such a piece from a picture sent to me. There is quite a while spent in preparation work, editing the picture, posterizing it, selecting back grounds... In the case of this piece, I took 2 different pictures of the 2 children and merged them. I was pleased with the results, so were the proud Mom and Dad


Sunday, April 28, 2013

Kids II

So this is  a commission work for Mother's Day.  I completed the layout of tesserae this afternoon and pre-grouted the back of the piece.


It has been an interesting project as there was no original picture of the kids together so I had to combine 2 different pictures (no, I did not "Photoshop" them, because Photoshop is too complicated for me, I generally now use Gimp which is quite user friendly, and free )...

In a later post I will provide additional pictures of the whole process; for now I cannot publish the pictures as we do not want the Kid's Mom might to find out, for it is a surprise !

The piece is 24" x 24" (about 60 x 60 cm). It does not include any stone, ceramic or porcelain and is totally made of Glasses or Mirrors.


Monday, March 25, 2013

Green River


Green River is a small piece - 12 x 36 " I played with multicolored slates, and travertines that reminded me of rocks in the mountains. I used green mirror and blue glass for the stream. The whole idea being that of an alpine torrent.


The last wild river we have in France is the Durance, You can find gorgeous stones in its bed, I brought quite a few of them from my last trip to France and will use them one day...


Saturday, March 2, 2013

Firegrass

I am presently working on 5 pieces. 

TUAREG is almost complete, it is framed, and will soon be published.

You have seen Tesshu's calligraphies : Dragon and Tiger.

Another Pair of Eyes is on the bench, as is a portrait of 2 kids - a Mother's day commission - which I won't be able to show until after Mother's Day ! 

FIREGRASS is a small piece - about 12 x 30" -  I am using the reversed method to allow for the various thickness of glasses, mirrors and marbles.


Firegrass - February 28, 2013


Working on several pieces at the same time is a good idea if you have space for this. It allows to let the glue settle on one piece while you work on another one. This is specially valuable in winter when the glue does not dry up as fast as in the Summer. It allows better progress.


Tuesday, January 29, 2013

The Making of a Mosaic

So here is how it can be done - I took quite a few pictures of the making of this Olive mirror - Using the reversed - or inverted method : Because I use materials of different thickness, I build the mosaic upside down. This can be a little tricky, but you get used to it.


It all starts with the drawing - here on a sheet of white paper - on top of which I laid a sheet of plastic. You don't really need to do this, but it makes the finishing part easier. 


Now I glue the tiles on top of the plastic sheet - following the pattern of the drawing underneath.


I am using a water based and soluble glue.
All tiles were cut ahead of time. Here I start with the leaves and olives themselves. The background will come later.


And here is the final result - fruits and leaves, without the background. For this piece, I used shiny materials : various marbles, ceramics and granites


Finally, I have laid the background - Travertine. The Travertine has a mat finish that will nicely contrast with the shine of the other stones.


Now I have laid the frame around the piece, and I have flipped it - notice how you now can see the actual colors of the stones. There is quite some time involved in removing the glue from the surface.


Details of the piece. Several slightly different travertines bring more life to the piece. 


Grouting - for this piece that included some gaps wider than 1/8",  I used a sanded grout.


After grout clean-up, now you get an idea of what the piece will eventually look like.


Installation of the mirror
I still needed to stain proof the piece - which I did using a commercial stone sealer.


Et voila le travail...


Note : There are different ways to work this method. I do not always use the plastic sheet, you can use different sort of glues, and I did not show the part right before flipping the piece - it is very important there to use a fresh thinset - make sure it is not too old (that the bag has been kept well closed since the last time you used it). Also make sure you let the thinset set for a while before you flip.  (48 hours is on the safe side) If you fail to do this : use a thinset that is too old, or rush to flip the piece, some catastrophes might happen, and you may have to spend lots of time trying to fix them. Thinset is not expensive, if you are not sure how old yuors is, dump it, go get a new bag...

Good luck


Thursday, January 10, 2013

3D Torso


This is my first 3 dimensional mosaic. Exclusively made of regular and irridescent glass and mirror tiles, this female torso is adorned with young fern-leaf looking tattoos inspired from those worn by Pict and Scottish tribes of Northern Britain of the Roman Era.


The technique is very different from the one I generally use, every thing is directly set on the fame. You also have to accommodate for the fact that ceramic - or glass, does not bend to fol,low the curvature of the frame...


I also used a different type of grouting on this piece - I wanted a copper coloured grout - which is not available on the market. I had to produce it myself - some research, some experiment... The result is beautiful.


Hope you enjoy it...


Wednesday, October 24, 2012

Eyes, Eyes, Eyes - October 2012.


It has been a while since I published anything. I had decided to experiment with steel frames. I believe this is probably the way to go for heavy pieces, such as the series of eyes I am working on presently.

Because these pieces are long and can be fragile (I broke one or two of them, and the repair work is something I would rather not have to do again) I now reinforce the backing board with wood before I transfer the mosaic onto it. I also thought the steel frame would also considerably reinforce the whole piece.

 
As I am not equipped to weld, I had to find welders to help me, this took a little while, tests, and errors (on my part)... 

Anyway, I am about to publish 3 more pieces, I need to get some good pictures of them, but  - for your eyes only - here are details of two of them,..


 "Los Ojos de Maribel"


and 

"Les Yeux d'Eva"...


Both pieces are approximately 53 x 14 inches (133 x 35 cm), and made of ceramics, glasses and granites.


Stay tuned, I will soon publish full pictures of these pieces. 

Send me a picture of the eyes of a person dear to you, I will create a beautiful mosaic of them.


Sunday, September 2, 2012

Reversed method


Most of my mosaics are made according to the reverse - or inverted method. I build them upside down, glue them on their support then flip them.

There are several reasons to do that :
When you work with materials of different thickness, and you want a flat , smooth result, this practically is the only solution.
It is also, in my opinion, results in a smoother  mosaic than the direct method.


The drawbacks are that you do not see exactly what you are doing, the colors of materials may be very different. Mirrors, for example, are usually grey or blue in the back. Stones are usually not polished on both sides, and the unpolished side is generally of a very different color ...


Here is an example of a piece right before and right after its flipping in August 2012. Remember than one is the mirror image of the other. You can see how the black granite looks very different in both pictures  Usually, non polished stones have much duller colors - but at times, the colors may be totally different from one side to the other... This is the case for some porcelains  and of most mirrors.

Eva's Eyes is mostly made of granite and ceramics. I will publish it in a few weeks when I have completed it. Once a piece is flipped, there are still quite a few hours to clean it up, grout it and frame it.


Tuesday, July 10, 2012

July 2012 Work in Process


Exclusive preview : The Eyes of Maribel


The Original - do you recognize her ? Maribel is Spanish...

The Maribel Mosaic being laid in my Headland workshop. I am using the Indirect method, which I like so much better. Even if it is a little more demanding, it allows such a better finish.


When completed, Maribel will be around 42 x 14" She is made of 2 different black granites, glasses and about 8 different nuances of ceramics, with a very few mirror tesserae also....

Stay tuned, if everything goes well, I should complete the laying by the end of next week and flip her next week...


ps : Also on its way this month : the Amazing Amazon Torso... Featuring Zoya the High energy Cat...