MosaicBlues: making of a mosaic .entry-content { font-size:25px !important; }
Showing posts with label making of a mosaic. Show all posts

Thursday, February 5, 2015

60 years later


In July 1954, Claude and Marie were enjoying a warm afternoon at le Bois de Cise...


In July 2014, Claude asked me to make a mosaic based on this picture... I went to work in Alabama, and delivered the mosaic in December, for Marie's Birthday...


Can you really think of a more awesome birthday or anniversary present than a mosaic portrait? Paintings can be gorgeous, but so can be Mosaics, and they last forever ! Some of the oldest art we have are Greeks and Roman mosaics !

I am a French Mosaic Artist. I live and work with my 2 dogs, 2 cats and many chickens in Alabama and have a second studio in France. You can see more of my mosaics on my mosaicblues pages. If you would like to discuss or commission a portrait mosaic, or any other type of mosaic, please call me at (334) 798 1639 or drop me an email at  frederic.lecut@gmail.com.


You can also Subscribe to my Newsletter wher I share with you the last news about Materials, Techniques and Sources of Inspiration of modern and antique (Specially Greeks and Romans) Mosaic Artists and Patrons !


Thursday, January 8, 2015

The Luana Mosaic - Videos


In 2014 I designed and executed a portrait of a talented young musician. The design was inspired by Renaissance Painter Alessandro Botticelli famous painting "Primavera".

This short video below simply shows the evolution of the faces from the original Renaissance painting by Alessandro Botticelli to the final mosaic. 


If you are interested in more details of the execution, this other video shows more views of the actual execution of this piece. 


Portraits make outstanding Birthday or Anniversary presents and mosaics last forever ! If you would like to discuss or commission a portrait, or any other type of mosaic, please call me at (334) 798 1639 or drop me an email at  frederic.lecut@gmail.com

You can also Subscribe to my Newsletter to get the last news about Materials, Techniques and Sources of Inspiration of modern and antique Mosaic Artists and Patrons !

Monday, May 26, 2014

Vandalism - Part Une


On Tuesday, May 20, at 5:21 pm, I completed laying the tesserae of Mariam Mesh. 


Mariam Mesh is an experimental piece. I am trying 2 new techniques with her. 

  • She is built on a fiberglass Mesh. (I will detail the hows and whys in a future post)
  • I am using a different glue on part of her - a flour based "Colla de Farina". With the hope to speed up the cleaning of the mosaic. 
Remember that I work mostly Reverse Method. I build my mosaics upside down, mounted on a model with a commercial water soluble glue. Then come several operations before I can separate the actual mosaic from the model. I have described this on several videos on my Mosaicblues Youtube Channel.

Once removed the model, there is still quite some time left to clean up the glue.
This  is why I decided to try this flour based glue, hoping it would be easier and faster to clean up thatn my regular glue...
On Wednesday morning, after feeding my chickens (you can hear them in most of my mosaics videos), I went to the shop to check on Mariam. And THIS is what I found :


Vandalized, most of the tesserae of Mariam's face and part of her eyes where laying shattered on the rest of the mosaic, or beside it...

I was worried, wondering who could have done this. Then I realized that only these tesserae glued with the flour glue had been shattered, something odd was at work there... No human would have been able to know the difference.

And then I remembered a young dead rat on the ground of the chicken pen. Rats don't usually die in the open. ( I know things about rats)


It did not take long to connect the dots. The rodent(s) had feasted on the flour glue. Unfortunately for this one, small shards of glass embedded in the glue must have caused his death by internal bleeding.

I have now finished the repairs (6 hours of work), and am covering the mosaic with heavy tiles when I get out of the shop. I am not sure whether I will keep using the "Cola di Farina" or not. This will depend upon the ease of cleaning it up once I flip the mosaic. 

This incident is a good illustration of how even minor changes in the way we do things can sometimes have unsuspected consequences. 

We should probably not trust corporations or governments when they tell us new technologies such as GMOs or fracking are absolutely safe...


Just saying ...


Wednesday, February 12, 2014

How to Video : Cutting long strips of granite.


In this short video I am showing how cut long strips of materials which you will later use to cut small cubes (the "tesserae) that are the building blocks of all traditional mosaics. 


I am using here a classic black granite tile with a thickness of 3/8" (9mm). The tile saw I am using here is fit with a diamond blade. It would cut diverse materials : granite, marble, slate, ceramic, porcelain, glass as thick as 3/4 " (18mm). It is important to chose a good quality blade with a solid rim. Brick blades simply won't do a very good job and will certainly not cut glass but shatter it.

And yes, I usually wear eyes protections, I just forgot that day. No need to post comment about this. Just do not forget to wear yours.

Practice...
 

Saturday, June 29, 2013

UBI TU GAIUS, EGO GAIA


The Romans had various forms of marriages, Generally, the first part of the ceremony took place at the house of the bride's paterfamilias where the bride's parents would hand over the bride to the groom. There would be happen some important verbal exchange. 

The bride would tell the groom :  

"Ubi tu Gaius, ego Gaia," 
"Where you are Gaius, I am Gaia." 

And the groom would reply :

"Ubi tu Gaia, ego Gaius"  
"Where you are Gaia, I am Gaius."

The pronuba, matron of honor, would then join the couple's hands. The marriage was now legally valid, and more festivities followed.

The ceremony could take place even if the groom was not able to be present. In that event, he would send a letter with his part of the verbal exchange.


        I am presently working on a mosaic on this theme - Pure Classical Roman style - no flashing colours, only natural tones of the kind the Roman mosaicists used up to the 3rd century - after which they started to use glass tesserae)


This is going to be my first mosaic of a pure Classical Roman style in a long time. The last one I did was the Labyrinth table - it was about 7 or 8 years ago. I came to mosaics because of my love of Roman archaeology, so this is a great pleasure to be working on such a project !

You can see on the picture above how I am - again - using the reverse method for this piece. Although this process is slightly more difficult to handle than the direct laying, I like the result much better ! It is also the only way for me to use materials of various thickness. 


Roman Marriage


More to come on this piece...
 

Wednesday, February 27, 2013

Coral Snake


Coral Snake is a small piece I made in 2012  

It is  12 x 12" (30 x 30 cm). It is made out of bright orange and teal glasses, chocolate marble and a beige  translucent sort of alabaster.


Like many other pieces I made Coral Snake using the reversed method. Because I use materials of various thickness, the piece has to be built upside down.

Here are some pictures of its making


The whole piece before applying the thinset and support


Details of the snake

Tuesday, January 29, 2013

The Making of a Mosaic

So here is how it can be done - I took quite a few pictures of the making of this Olive mirror - Using the reversed - or inverted method : Because I use materials of different thickness, I build the mosaic upside down. This can be a little tricky, but you get used to it.


It all starts with the drawing - here on a sheet of white paper - on top of which I laid a sheet of plastic. You don't really need to do this, but it makes the finishing part easier. 


Now I glue the tiles on top of the plastic sheet - following the pattern of the drawing underneath.


I am using a water based and soluble glue.
All tiles were cut ahead of time. Here I start with the leaves and olives themselves. The background will come later.


And here is the final result - fruits and leaves, without the background. For this piece, I used shiny materials : various marbles, ceramics and granites


Finally, I have laid the background - Travertine. The Travertine has a mat finish that will nicely contrast with the shine of the other stones.


Now I have laid the frame around the piece, and I have flipped it - notice how you now can see the actual colors of the stones. There is quite some time involved in removing the glue from the surface.


Details of the piece. Several slightly different travertines bring more life to the piece. 


Grouting - for this piece that included some gaps wider than 1/8",  I used a sanded grout.


After grout clean-up, now you get an idea of what the piece will eventually look like.


Installation of the mirror
I still needed to stain proof the piece - which I did using a commercial stone sealer.


Et voila le travail...


Note : There are different ways to work this method. I do not always use the plastic sheet, you can use different sort of glues, and I did not show the part right before flipping the piece - it is very important there to use a fresh thinset - make sure it is not too old (that the bag has been kept well closed since the last time you used it). Also make sure you let the thinset set for a while before you flip.  (48 hours is on the safe side) If you fail to do this : use a thinset that is too old, or rush to flip the piece, some catastrophes might happen, and you may have to spend lots of time trying to fix them. Thinset is not expensive, if you are not sure how old yuors is, dump it, go get a new bag...

Good luck


Sunday, September 2, 2012

Reversed method


Most of my mosaics are made according to the reverse - or inverted method. I build them upside down, glue them on their support then flip them.

There are several reasons to do that :
When you work with materials of different thickness, and you want a flat , smooth result, this practically is the only solution.
It is also, in my opinion, results in a smoother  mosaic than the direct method.


The drawbacks are that you do not see exactly what you are doing, the colors of materials may be very different. Mirrors, for example, are usually grey or blue in the back. Stones are usually not polished on both sides, and the unpolished side is generally of a very different color ...


Here is an example of a piece right before and right after its flipping in August 2012. Remember than one is the mirror image of the other. You can see how the black granite looks very different in both pictures  Usually, non polished stones have much duller colors - but at times, the colors may be totally different from one side to the other... This is the case for some porcelains  and of most mirrors.

Eva's Eyes is mostly made of granite and ceramics. I will publish it in a few weeks when I have completed it. Once a piece is flipped, there are still quite a few hours to clean it up, grout it and frame it.


Wednesday, September 21, 2011

Marylin Mosaic

Every one knows Marylin...

After Nikki, Marylin is my second experiment with the direct method of laying the tesserae. This the Wysiwyg of Mosaics...


Marylin is exclusively made of recycled glass materials, no more than 3/16" in thickness. This material is more brittle than regular glass, and does not cut as well.. It provides however a very beautiful and more modern look.  

Because of the thinness of the material, This mosaic is much lighter than the usual stone ones. 


The original picture. 


For portraits, I exclusively work in Black and White or Sepia tones, and enhance the image by using a colored background around it. In this case, the background is black as it was originally in the picture. In the Nikki Mosaic, I used blues, greys ans greens to suggest the ocean.


I am available for commissions. Send me a picture of yourself, of a loved one, of your pet, and I'll produce a beautiful mosaic portrait for you.


Sunday, August 28, 2011

Marilyn

There is no need to introduce Marilyn...


I began laying the tesserae on July 23rd, I used a total of 6 different colors : Black, White, and 4 different shades of brown.


On August 28, I completed the pose of the last tesserae. I still have to remove Marilyn from her support and transfer her onto some rigid material before I can frame her. 


I am using for Marilyn the same direct pose technique and the same type of materials I have used for the Nikki Mosaic : Recycled glasses.

Keep in touch, I will post more pictures of the mounting and framing of Marilyn...


Saturday, June 18, 2011

The Italian Bathroom - II

The bathroom cabinet over the sink. This is a mosaic made of glass and tainted mirrors, I had never used these materials to this extent before, and I must say I enjoyed this experience. 


Another interesting aspect of this project is that I used the direct method for the first time. in the past, I have always used the inverted method, because i was generally using materials of various thickness. With the kind of glass and mirrors I used here, it was not necessary.


Detail of the mosaic on the cabinet door


 As I am now writing (June 2011) I just started my first big piece with the direct method. A different - and interesting experience... 

It's a surprise and  should be competed by the end of July...


Sunday, February 20, 2011

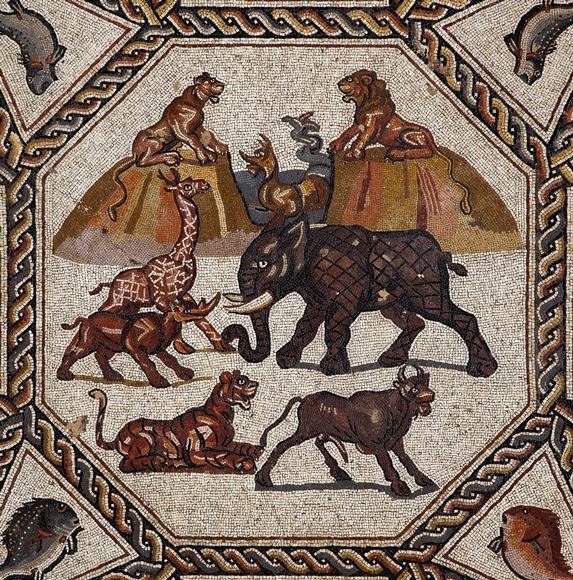
The Roman Mosaic of Lod

In 1996 a series of gorgeous mosaic floors was accidentally uncovered during highway construction in the modern Israeli town of Lod, 15 km (9 miles) from Tel Aviv. 

Lod is the ancient town of Lydda, which was destroyed by the Romans in A.D. 66 during the Jewish War and later rebuit.  

The mosaic floors measure approximately 17 by 9 meters (50 by 27 feet). Debris of pottery and coins of the third and fourth centuries A.D., suggest they were laid in about A.D. 300. 

They are of exceptional quality and in an excellent state of preservation. The three best-preserved and most interesting panels have been selected for the loan exhibition that is to tour America during the next couple of years while a permanent display is constructed at Lod itself.

Mosaics were a costly and time-consuming addition to a property, although they would thereafter require little maintenance and could be expected to last a lifetime. Because of the heavy initial investment however considerable care and attention was paid to create designs that were attractive and appropriate, both to the owner and to the setting.  
  
Despite all the diversity in their manner of execution, design, geographical setting, and dating, Roman mosaics display a number of similarities. So it is very possible that some elements of the Lod Mosaic drew on standard pattern books in use by mosaicists of the Roman Empire. Dolphins are common on Greek mosaics from Delos, marine scenes in Pompeii, and panels with animals and birds within geometric frames in German  Cologne of French Arles.

Image:
 central panel with the assortment of African and other animals
The central Panel

The depiction on the Lod Mosaic of solitary or paired groups of creatures, such a large feline hunting a grazing animal, forms part of the common stock of genre subjects. 

The central panel with its assortment of African and other animals is absolutely remarkable. The depiction of an elephant, giraffe, and rhinoceros must have been very striking on the coastal plains of ancient Palestine, where such animals were unfamiliar. 


Exhibition Schedule in the USA :

The Metropolitan Museum of Art, New York

September 28, 2010-April 3, 2011

Legion of Honor, Fine Arts Museums of San Francisco

April 23, 2011-July 24, 2011

The Field Museum, Chicago

later

Columbus Museum of Art, Columbus, Ohio 

later

Sunday, September 19, 2010

The Italian Bathroom


I am close to completing my Japanese house. It will be used mostly as a dojo to study and practice martial arts and zen. To the main practice hall, I added a small kitchen and bathroom. The Kitchen is in a Mexican style, and the Bathroom in the Italian one. 

This is the entrance to the shower. The walls to the bathroom itself are venetian plaster. The shower is a mosaic of travertine, granite and glass. 

I wanted to give the idea of water running on the walls. In order to show that, I have used some wide travertine tiles lid in a diamond pattern, interrupted by lines of small stones giving that running impression. The contrast between the wide flat travertine tiles and the small mosaic stones is very interesting.


The top and bottom of the shower are exclusively mosaic (no big tiles) laid to show meanders in the water running toward the drain. 

The whole enterprise was very time consuming, but it was well worth my time and effort!

Friday, May 7, 2010

Rising Sun

In early Japanese history, the Rising Sun, or Hinomaru motif was used on flags of daimyos and samurai.  

Rising Sun is my last Mosaic Creation.


This Mosaic designed in an Art Deco Style, is almost entirely made out of mirror pieces. I only used black granite and ceramic for the outside borders.


Mirrors are a little different than regular stone or ceramic tesserae. Although the process of laying the tesserae is the same ( I always use the the inverted method, and lay my pieces upside down), the following operations - gluing, grouting, are made more complicated because of the material used to make the mirror. To make a long story short, mirrors do not adhere to thinset as well as stone... So you have to use your imagination - and experience - to make sure it is going to stick well ! 


Rising Sun has taken a long time to complete, as I am actually also working on 2 beautiful walk-in showers, one made of ceramic, glass and marble, the other one, in a similar style, made of Travertine, Dark brown Marble, Granite and Colored Glasses. 

I should soon be able to post pictures and comments about these 2 beautiful pieces

Monday, January 11, 2010

The Alexander Mosaic

Found during the 1831 excavations in the lava-buried town of Pompeii, the Alexander mosaic (now on display at the National Archaeological Museum in Naples) is the most famous example of an early tessellated mosaic. 

Measuring 19 feet by 10 feet, the piece was made around 100 B.C. out of roughly 4 million tesserae (small mosaic tiles).

The artwork once decorated the floor of a room in the House of the Faun, one of Pompeii's grandest residences.

Read more at Discovery News

Monday, December 21, 2009

The Making of a Mosaic - Episode II


Once finished laying the stones upside down, I sprinkle them with a thin layer of grout and spray them with water. After a few hours I follow up with a coat of thinset. I like to mix the thinset with an acrylic additive, to improve its resilience and adhesive power.

This is a small windrose tabletop ready to be filled with thinset. You can see the difference in thickness of the different materials. the black granite is about 5/16" (8 mm) thick, while the red glass is about 1/8" (3 mm) thick. The direct method would not allow such disparity in thickness.

I finally cover the thinset with a structural material,  - I like commercial concrete backing boards used to cover bathroom walls to be laid with ceramic tiles.

I let it dry for at least 48 hours before flipping the piece. This is important. I have damaged some pieces for I was to eager to see them. The thinset needs time to solidify and release moisture. The does not really depends on temperature. It simply needs time.


I wrote somewhere else that the flipping of a mosaic is a very exciting thing, like a birth.  In a few seconds, you see what you created. It is very different from the  direct way, where you set the stones one by one and see your work appear little by little. Here, it is more like a birth; suddenly, the butterfly emerges from its chrysalis.

Here is the Olive Mirror right after being flipped.


Now we are almost done; in "Making of a Mosaic - Episode III", we will complete our work.

Wednesday, December 16, 2009

The Making of a Mosaic - Episode I

There are different technics to create mosaics. So far I have used the reversed way, I create my mosaics upside down, because it enables me to use materials of various thickness.


First you design a pattern. Here I protected the paper pattern with a sheet of transparent plastic, this makes it easier to clean up the stones during the finishing phase.


Then you set the tesserae (pieces of stones, glass, ceramic) upside down, and glue them onto the pattern with a water soluble glue. As you can see here and on the next view, The reverse method makes it possible to use tesserae of different thickness.


In order to minimize the weight of my mosaics, I like to use the thinner possible materials. However, stones do not always collaborate. Stones of different kind have different personalities. Granites are hard, but can be cut in any directions, Slates are very smooth, but tend to not cooperate, Travertines ans marbles are softer, but are difficult to cut under 1/8th of an inch, Glass cannot really be cut with a saw as stones can be...

See the end of this work on Making of a Mosaic - Episode II